Subscribe To Emails
Subscribe to the YourCotton mailing list to receive updates on new arrivals and promotions (about once every 6 weeks)!
Quilting has been a popular tradition for centuries and is still widely enjoyed today. Not only does quilting provide pleasure, but it can also be used to create beautiful works of art. However, making a perfect pattern that resembles its design’s frame requires accurately cutting your quilt squares into suitable shapes and sizes. While this skill may seem complicated at first glance, with proper practice and patience, anyone can craft perfectly shaped pieces for their quilt. This article will provide a detailed step-by-step guide on cutting your quilt squares so that you can also make breathtaking designs.
Quilt squares make the perfect canvas for displaying fabric designs, embroidery, or patchwork. Whether making a small wall hanging or a large quilt, deciding on the right side of a quilt square is essential. An ideal size for most quilts is an eight-inch square, which creates enough space for detailing without taking too long to sew together. Oversized quilt squares such as twelve inches can be used if the design requires a larger surface area. When considering the size of a quilt block, factor in how many blocks will be used and what impression you want your finished quilt to make.
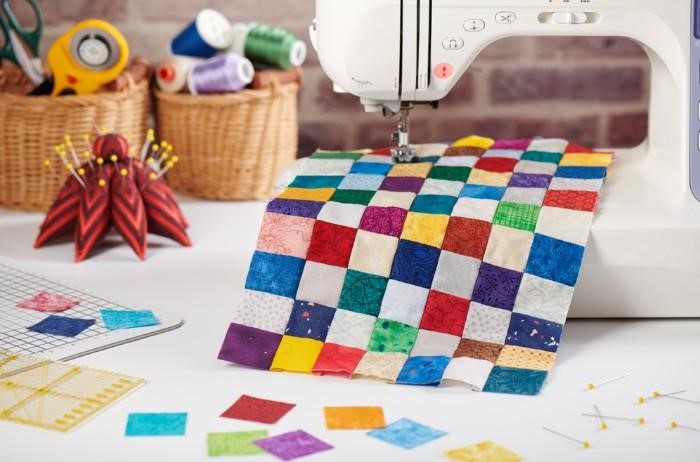
Once the size of your quilt squares has been determined, you can begin cutting them out. To ensure the most accurate shapes, use a rotary cutter and cutting mat for a smooth cut. Here are the steps to follow when cutting quilt squares:
The first step is to cut a square of your chosen fabric. Make sure the square size is slightly larger than the one you aim for, as this will help trim any excess fabric easier. To cut fabric, line up the ruler to your fabric’s edge, and then use the rotary cutter to cut along the ruler’s lines.
After cutting the fabric into a square, measure it and mark off the size you need with a pencil or fabric marker. The edge of the fabric should be measured in inches and marked accordingly.
Using the rotary cutter and mat, cut away any extra fabric around your quilt square that exceeds its desired size. Make sure to keep your cuts as straight as possible so that all of your multiple squares are consistent in shape and size. To cut multiple squares at once, line up the fabric and make multiple cuts.
To give your quilt an even more distinct look, use scissors to trim away any excess threads or uneven seams on the sides of your square. This will help make sure that your pieces are smooth when put together.
Once your quilt squares are cut, it is time to begin putting them together. Begin by pinning the squares you want to sew together and ensuring they all face in the same direction. After pinning, use a sewing machine or hand-sew the pieces according to your pattern's instructions.
After cutting the square, you should immediately use your newfound piece to create something new. Whether making a pyramid out of paper or using your square to construct a miniature house, creativity will help you maximize the square's potential. With each pass with your scissors, thinking of possible ways to craft something exciting and new is essential. Pre-made patterns can help guide your creative vision and let you make some beautiful or impressive structures in no time. Take time out to explore what's possible with the result of your initial cut; there are boundless possibilities when crafting artwork from its parts.
When it comes to quilting, precise cuts are crucial to achieving a successful project. If even the smallest of pieces are cut too small, that can completely alter the overall look of the quilt. Additionally, if two pieces don’t fit together perfectly, the next few layers may be off, causing an uneven outcome. Therefore, it is important to ensure every inch is accurately sliced because it helps ensure uniformity among all layers and ensures that once the finished product is sewn together, it looks perfect. Cutting with precision also makes for a much easier assembly; if parts don’t line up correctly, it takes extra time away from sewing or creating designs. Straight-line cuts can help make the process more efficient and enjoyable. Taking a few spare moments for accurate measurements will make your quilt look polished and well-crafted.
Cutting quilt squares requires a lot of patience and precision, so it is important to ensure that your pieces are properly stored until you’re ready to begin piecing them together. You can store cut quilt squares in resealable plastic bags or airtight containers, making sure they are labeled with their size and quilting fabric type. Additionally, if you’re planning on using the same fabric for multiple projects, keep the extra material you left from cutting quilt squares in a separate bag or container. This will help avoid confusion when selecting fabrics later down the horizontal line. Half-square triangles, or HSTs, can also be stored this way.

Making intricate designs out of quilt squares requires mastering the basics first – accurate cuts being one of those fundamentals. With this step-by-step guide, you can now confidently cut squares into precise shapes and sizes that will serve as the foundation for your stunning creations.
Accurately cutting quilt squares is essential for making beautiful pieces of art. Following the steps outlined in this article, you can ensure that each square is measured correctly and trimmed, creating a uniform base to build on. Proper storage of extra fabric or cut pieces will also help ensure efficiency when piecing projects together down the line. Even novice quilters can easily craft magnificent works with steady practice, patience, and creativity!