Subscribe To Emails
Subscribe to the YourCotton mailing list to receive updates on new arrivals and promotions (about once every 6 weeks)!
Creating a quilt from beginning to end is a rewarding and satisfying experience. From the fabrics, batting, backing, and thread you choose for your project to the finished product ready for snuggling under on chilly evenings or giving as a thoughtful gift—there's nothing quite like it! Finishing the project with the perfect binding ties it together in a final fashion. If you're just starting your quilting journey and feel intimidated by this last step of binding a quilt, don't worry! We've got you covered with this beginner's guide that will take you through every step necessary for achieving solid yet beautiful bindings.

It depends on the project. Generally, quilting is done before binding, as it holds all of the layers of the quilt together and gives it its finished look. However, some quilters prefer to bind their projects before adding decorative stitching or other embellishments. Ultimately, the order in which you do either task comes down to personal preference and the specific needs of your project. If quilting first, you may need to adjust the amount of fabric you purchase for binding to fit correctly around your quilt's finished size. Similarly, if binding before quilting, you'll need to account for shrinkage due to the quilting process to ensure your binding fits correctly.
To bind your quilt, you'll need a few basic supplies:
-Quilting fabric for the binding strip. The amount of material required will depend on the size of your quilt but aim for at least a quarter yard (22 cm) per side.
-Scissors or rotary cutter and mat to cut the fabric strips.
-Iron and ironing board to press seams and folds.
-Small pins or clips to secure layers together when sewing.
-Sewing machine with general-purpose foot and thread in colors that coordinate with your binding fabric. You may also choose an invisible stitch if desired.
Here are some basic steps for binding a quilt:
1. Prepare The Binding Strips
Cut 2 ½" wide strips from your fabric for a standard quilt binding. Sew the strips together end to end to make one long continuous strip that is at least four inches longer than the perimeter of your quilt (if you are piecing scraps together, there is no need to alternate directions).
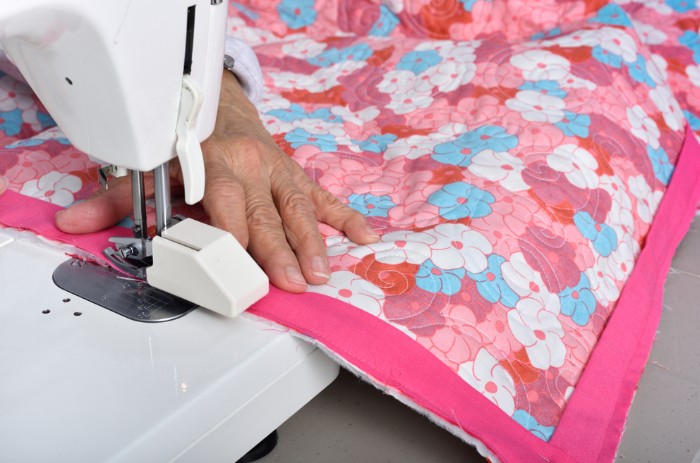
2. Attach The Binding
Place one edge of your binding strip on top of a quilt edge of your quilt and pin it in place. Start sewing ¼" away from the raw edges using a straight stitch line across the width of the quilt. Unfold the remaining portion of the binding and fold it over itself, so it matches up with the other folded edge along that side, then pin it into place and continue stitching. The double-fold binding should be about 1/4" wide when finished.
3. Sew The Binding Ends Together
After stitching all four sides, fold the binding at a corner of your quilt so that the surrounding fabric edges meet in the middle. Measure and trim off any extra length to be precisely five inches. Then tuck the end of one strip into the other to form a right angle and pin it in place. Sew the two strips together, then unfold and press with an iron.
4. Turn Over To Complete Quilt Binding
Fold over your binding once more along each side of your quilt by approximately ¼" and pin in place again before stitching close to the edge of your quilt all around. Once finished quilt, turn your quilt over to the right side, and you're done.
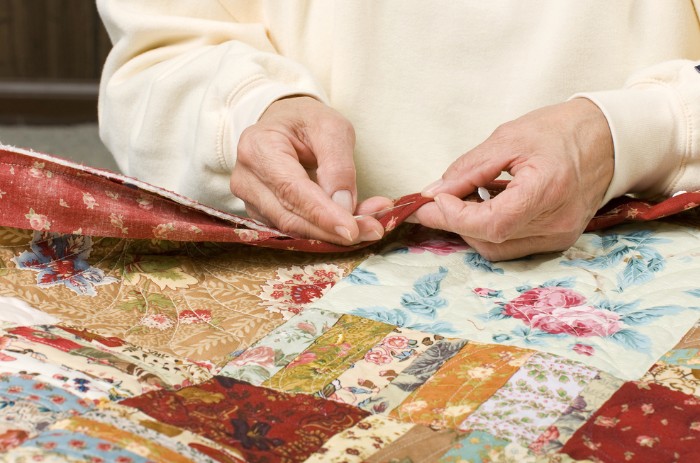
Hand quilting can be an excellent way to add a personal touch to your quilt. Machine binding is faster, but some quilters find the process of stitching by hand more enjoyable and rewarding. The same basic steps are used as described above, except Here's what you need to know about hand quilting:
Thread
Use high-quality thread that is specifically designed for hand quilting. The right kind of thread will glide through the fabric easily, reduce fraying, and make your stitches look even and neat. In addition, use a color that matches or compliments your backing fabric and batting – too much contrast looks jarring.
Needles
Purchase needles with large eyes that are made especially for hand quilting. Try different sizes until you find one that works best for you.
Batting
Select light, thin, and breathable batting, allowing easy quilting. You should also choose a natural fiber such as cotton or wool to ensure your quilt will be durable and long-lasting.
Backing Fabric
Select a backing fabric that is large enough for the top of your quilt, plus four to five inches on all sides – this will give you room for trimming later. Using one piece of fabric rather than piecing it together from several smaller pieces is essential, as this can cause puckering in the end product. Quilters often use muslin or flannel for the backing fabric because they are inexpensive but still provide adequate support.
Marking Tools
Use a marking tool such as a quilter's pencil or pen, making it easier to draw even lines. You can also use a water-soluble marker; just be sure to test it first on an inconspicuous area of the fabric.
Quilting Frame
A quilting frame isn't necessary, but it can make the process much easier. A quilting frame holds your work in place while you stitch and makes long lines of stitches go faster. If you're using a hand-quilting hoop, regularly rotate your fabric so the tension remains even across all sections.
Binding a quilt can be intimidating for beginners, but with some patience and practice, you'll soon master the art. Take time to select the suitable fabrics and supplies, double-check your measurements, and enjoy stitching it all together. You'll have a beautiful quilt ready for snuggling up in no time! The binding edge of the quilt is a great way to complete your quilt project with a neat and finished look.